One of my chief complaints with Windows 8 is that Microsoft forced you to boot to the new Start screen rather than giving you the option of booting to the desktop--which is where I prefer to hang my computing hat.
You could work around this using any number of utilities (most of which were designed primarily to restore the missing Start button, essential if you are working in Desktop), but with the release of Windows 8.1, Microsoft has added the capability.
In other words, now you can boot directly to the desktop. It's not immediately obvious how--Microsoft still doesn't outfit Windows with any "guides to new features" or the like, a silly oversight--but at least it's easy once you know the steps.
1. After booting Windows 8.1 (here's how to get the preview if you don't already have it), click the Desktop tile to enter Desktop mode.
2. Right-click any open area in the taskbar, then click Properties.
3. Click the Navigation tab, then check the box next to Go to the desktop instead of Start when I sign in.
4. Click OK, then reboot. Windows should plunk you right into Desktop.
And that's all there is to it. If you want to go back to Start-screen booting, just repeat the process and uncheck the box in step 3. (Also, if you don't have a Navigation tab, leave a comment letting me know. This appears to be an issue for some users. I'm investigating why.)
What are your thoughts on this? Where do you prefer to land when you boot Windows 8?
A recent convert to Gmail, RLConner asked the Answer Line forum about organizing mail into what Google calls "labels,' although they're similar to other services' folders.
Gmail labels behave very much like folders in other digital environments. You can store messages and conversations in them to organize your mail. And they're hierarchical--you can put one label inside another. For instance, I keep an Answer Line label, and inside that I have labels for newly-arrived reader questions, questions I've put aside for possible use in the blog, and reader comments.
Google doesn't called them folders because you can attach multiple labels to a single message. Imagine you're dealing with paper instead of electronic messages. You can put a sheet of paper into a folder, then pull it out and put it in another folder, but you can't keep it in both folders at the same time. Yet you can stick two or four or 18 labels onto that sheet of paper. Add the kind of search capabilities you don't get with paper, and you can see the advantages..
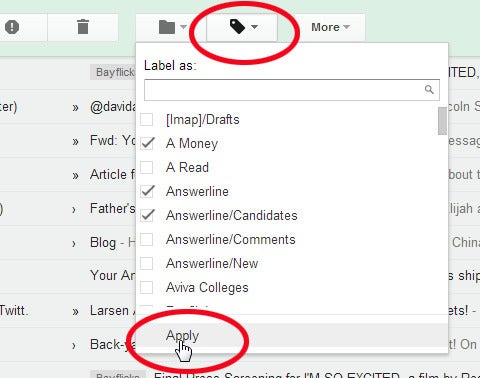
You've got three ways to assign a label to a message:
Click for full size
If you select or open a message, you'll see a label icon near the top of the Gmail window. To assign a label to a message, click that icon, select one or more labels from the pull-down, then clickApply at the bottom of the menu.
You can also move a message to another label--which feels like pulling it out of one folder and putting it in another. That's why you move a message by clicking the folder icon to the immediate left of the label icon.
You can also move a message by dragging it to a label in the left column.
To create a new label, click either of the two icons discussed above, and selectCreate new.
Gmail offers two ways to make other changes to labels, such as renaming them, deleting them, and so on:
Click either of the discussed icons discussed above. The last item on the pull-down menu will be Manage labels. This brings you to a full-page label-editing environment.
Point to a label in the left column, but don't click. A down arrow icon will appear to the right. Click it for a menu of editing options.
MLStrand56 had a Gmail question for the Answer Line forum: How does one archive or delete every email from a particular sender--or that matches some other criteria?
Gmail lacks an obvious, simple tool for bulk operations. There's no button to click or menu option to select for deleting or altering all of the messages or conversations that share a specific attribute. But you can still do it.
Before any bulk operations, remember that Gmail defaults to presenting your mail not inmessages (what I sent to you), but in conversations (what I sent to you, your reply, my reply to your reply, and so on). So when you delete all the messages from, say, your ex, you'll also delete every other message in all of those discussions.
If that isn't what you want, turn off Conversation mode. Click the tool icon near the top-right corner and select Settings. In the General tab, select Conversation view off. You may want to turn it back on when you're done.
You start the bulk process with a search. If you want to delete all messages from a particular address, click the search field near the top of the window and type from:,followed by the address, such as from: answer@pcworld.com (although I hope that's not the address you want to delete.)
On the other hand, if you want to delete or move all of the messages connected to that address--from, to, cc'd, or even just referenced in the text--skip the from: label and just type in the address.
You'll soon have a list of messages that match your criteria. Click the Select button--the one with the box icon immediately to the left of the Refresh button. This will select all visible messages or discussions, but probably not all that match your search criteria. So follow that by clicking the Select all conversations that match this search link.
Last week we talked about Gmail's spiffy new inbox-sorting tabs. Today let's look at another new feature, one that's just starting to roll out to users: a full-screen new-message window.
By default, when you click Gmail's Compose button, you get a window that appears in the right corner of the screen.
Now there's a new option. In the top-right corner of that Compose window, you'll see three icons: Minimize, Full-screen, and Close. Clicking that middle one enlarges the window, though the description "full-screen" is a little disingenuous here: you actually get a larger, centered window that darkens the background.
At least, that's how it appears on my system, which runs at 1,920 x 1,080. If you have a lower-resolution screen, the window may indeed seem closer to full-screen. (Anyone running, say, a 1,366 x 768 display? Hit the comments and let your fellow readers know if the window really is "full-screen," or still just bigger and centered.)
In any case, I greatly prefer that enlarged Compose window, and want it to appear every time I write a message--without me having to click the aforementioned icon.
Fortunately, it's easy to make this the default:
1. After you click Compose, look for the little arrow in the lower-right corner of the Compose window.
2. Click that arrow, then choose Default to full-screen.
That's it! Now you'll get the big window every time. If you decide you prefer the smaller window, just repeat the process.
Speaking of which, which size do you prefer: big or small?
Back in March I told you about VideoBuzz, a third-party Roku channel that adds a desperately needed capability to the popular media-streaming boxes: YouTube.
Alas, not long after, Roku ordered VideoBuzz to shut down, again leaving owners with no way to stream their favorite cat videos, movie trailers, "Colbert Report" segments, and so on.
Why Roku still doesn't offer a proper YouTube channel, I have no idea. But here's good news: VideoBuzz is back, at least for a while. Here's how you can get it:
1. You'll need Google Chrome or Firefox; for whatever reason, the installer won't work in Internet Explorer.
2. Turn on your TV and switch to the input that has the Roku box connected.
3. Write down the IP address for your Roku box, which you can find in the Settings, About menu (or Settings, Player Info if you have a first-gen box).
4. Back at your PC, head to the installer page for MyVideoBuzz. You may see an error message at first, but if you're using a compatible browser, in a moment a pop-up box will appear with step-by-step instructions.
5. When you get to the third step, enter your box's IP address in the provided field, then click Next.
6. Now you'll need to enable the box's developer mode, which is done by pressing buttons on the remote in a certain sequence. It took me two tries to get this to work; the trick seems to be pressing them fairly quickly, without long pauses in between.
7. Follow the prompts to agree to enabling developer mode, after which your Roku will reboot. Then return to your browser and finish with the installer there.
Presto! Now you should have the MyVideoBuzz channel on your Roku box. (Feel free to throw the developers a few bucks if you find this as valuable as I do.) I recommend jumping right into its Settings menu and adding your YouTube account.
Now, if you'll excuse me, I have an appointment with a very surprised kitty.
Dick uses Google Earth on more than one PC. He asked how to sync placemarks between them.
Oddly enough, Google's extensive cloud services don't do much for Earth (the program, not the planet--although it probably doesn't do much for that, either). You'd expect that if you have a Youtube, Gmail, or other Google account, Earth would sync automatically. But it doesn't.
Luckily, there is a workaround, even if it's a bit clumsy.
But first, a quick review on creating a Google Earth placemark. In Earth, either click the yellow pushpin icon on the toolbar or select Add>Placemark from the menus. Another yellow pushpin and a dialog box will appear. Drag the pin to your desired point on the map, then enter a name in the dialog box.
Here's another way to do it: Search for an address or location. The name will appear below the Search field. Drag it to Places below the search result.
In order to sync your places, you'll need to save them in a .kmz file. To do so, selectAdd>Folder. Give the folder a name, such as Synced Places. Once you click OK, the folder will appear in the Places pane below Search. Drag all of your places and placemarks (or just the ones you want on the other PC) to the new folder. You'll have to drag them one at a time.
Now right-click the folder, and select Save Place As. Save it as a .kmz file (the default).
Where should you save it to? If you're using a cloud storage service like DropBox or iCloud, save it there, so it will end up in the cloud and be available on every PC and device you use.
If you're not using a cloud storage service, and don't want to use one, you can simply save it anywhere, then email the file to yourself.
Then, on your other computers, open Google Earth and select File>Open. Open the .kmz file.
Things can be trickier with a mobile device, especially an iPad and iPhone, since iOS lacks a general file system. The instructions below apply specifically to DropBox, but other cloud storage services will likely behave in a similar way.
Open the DropBox app on your device. Go to and tap your .kmz file. On an Android device, the file will load into Earth automatically. In iOS, Dropbox will give you an "Unable to view file" message. Tap the Open in icon in the upper-right corner, then tap Open in Google Earth.
If you're anything like me, you probably have hundreds—if not thousands—of photos on your phone. Getting those photos off your phone isn't always entirely obvious, but you have a number of options at your disposal.
Using USB
The traditional approach to getting stuff off your phone is to plug it into your computer using a USB cable.
On Windows: Windows treats Android phones like any other camera, so when you plug your phone into your computer, Windows will ask you what to do, just as it would if you plugged in your digital camera. You can peruse the actual files in Windows Explorer, have Windows Explorer import all the photos for you, or use another program to import the photos, like the Windows 8 Photo Viewer app.
On OS X: If you've got a Mac, getting photos off your Android phone requires Google's free Android File Transfer app, a very basic file browser app that runs on Mac OS X 10.5 or later, and works with Android phones and tablets running Android 3.0 Honeycomb or later. Once you install the app, it will automatically open whenever you attach an Android phone or tablet to your computer.
Mac users need to rely on the Android File Transfer app.
Your photos will be in one of two areas: The Pictures folder or the DCIM folder. Photos you took with your phone will likely be in your DCIM folder, while other photos or images (like screenshots) you keep on your phone will likely be in the Pictures folder. To save photos you took with your phone's camera, double-click the DCIM folder. You may see another folder within that named "Camera." Open this folder, and you should be able to get at your photos.
Email yourself
Sometimes, it's just easier to email yourself.
Android makes it easy to email photos to yourself. It's not really an ideal option if you have more than a few photos you want to move off your phone, but it's there if you need it.
Open the Gallery app, and navigate to the album containing the photo (or photos) you want to share. Tap the three dots in the upper right corner, and then tap Select Item from the menu that appears.
Select the photos you want to send to your computer, then tap the email button in the toolbar at the top of the screen—it looks like an envelope with a card sticking out of it. If the email button doesn't appear in the toolbar, tap the share button—it looks like a sideways V—and select Gmail from the menu. You'll get a "compose" window where you can enter your email address then send your images to yourself.
Google Drive
The Gallery app also lets you upload your photos to your Google Drive, so you can get at them from anywhere. If you install the Google Drive app on your Mac or PC, you can have your photos and other files automatically sync to your computer.
Upload your photos to Google Drive and get at them from anywhere.
To upload them to Google Drive, select the photos you want to upload, then tap the share button. From the menu, tap "See all," then select Drive from the list. It'll ask you to give the photo a title and to confirm which account you want to upload to, and where you want to put it on your drive. If it all looks fine, tap OK, and it will go ahead and upload your photos.
Dropbox and other online storage services
Once you install the Dropbox app on your phone, you can add photos to your Dropbox from within the Gallery app.
Dropbox is another good option for getting photos off of your phone: Install the Dropbox client on all your computers and devices, and it will sync files in your Dropbox to everything. You can pick and choose the photos you want to upload by installing the free Dropbox app for Android, which is useful if you want to pick and choose which photos you want to get off your phone.
Once you install the Dropbox app, you can upload your photos to Dropbox directly from Android's Gallery app. To do so, select the photos you want to upload, tap the sideways-V-shaped share button, tap "See all" from the menu, then tap Add to Dropbox. From there, you can choose where on your Dropbox you want to stick your photos. Once you're ready to upload your photos, tap Add, and Dropbox will work its magic. Your photos should then appear on all your devices with Dropbox installed.
Camera Upload, another Dropbox feature, lets you automatically upload your photos from your phone directly to Dropbox, so you don't have to individually select then upload them. You can choose to turn this feature on when you first install the Dropbox app on your phone, or from the Dropbox app's settings (tap the three dots in the upper right corner in the Dropbox app, then select Settings from the menu).
Dropbox is arguably the most ubiquitous online storage and syncing service out there, but it's hardly the only one. Other options include Box.net, Amazon Cloud Drive, and Microsoft SkyDrive. All of these apps do the same basic thing, though each app works a little differently.
Most modern laptop LCDs and desktop monitors are extremely wide, which doesn't make sense when you consider that most Web pages are narrow and intended for portrait-style viewing. Indeed, if you look at this very page, you may notice some unused white space on either side.
Of course, you can always keep a browser open in one window and something else in another: Windows makes it easy to split them into two equal halves.
NiftySplit is a browser extension that brings that idea to Google Chrome--but with an incredibly useful twist. The best way to explain it is to show you how it works.
After installing NiftySplit, head to a site like, oh, PC World. Find a story you want to read, then right-click the link and choose Open as NiftySplit window.
NiftySplit will immediately divide Chrome into two windows: the original on the left and the linked page on the right.
What's more, links in the original window now work dynamically: click any other link and you'll immediately see that page open in the right-hand window.
This can save you a ton of back-and-forth page hopping. Sure, you can open any link in a new tab by holding down the Ctrl key when you click it, but that's not quite the same thing.
Indeed, I think once you give NiftySplit a try, you'll find it an invaluable addition to your browser. It definitely works best if you have a large, high-resolution display (otherwise you may end up doing a lot of horizontal scrolling), but either way it's worth a look.
Contributing Editor Rick Broida writes about business and consumer technology. Ask for help with your PC hassles at hasslefree@pcworld.com. Sign up to have the Hassle-Free PC newsletter (which is included in the Power Tips newsletter) e-mailed to you each week.
Subscribing to Hulu Plus or Netflix is a great deal—until you find yourself on a less-than-perfect Internet connection. Perversely, your streaming media library is most valuable in places where you can’t access the Internet: Watching a movie or burning through episodes of your favorite TV show is the best way to get through a long plane trip, a car ride, or a vacation in the middle of nowhere.
Luckily, you can use third-party software and a few tricks to download streaming video from Amazon, Hulu, and Netflix. Now you can watch your entertainment on your terms, even in places where your cherished Amazon Prime account is inaccessible.
Bottling the Amazon Prime Instant Video stream
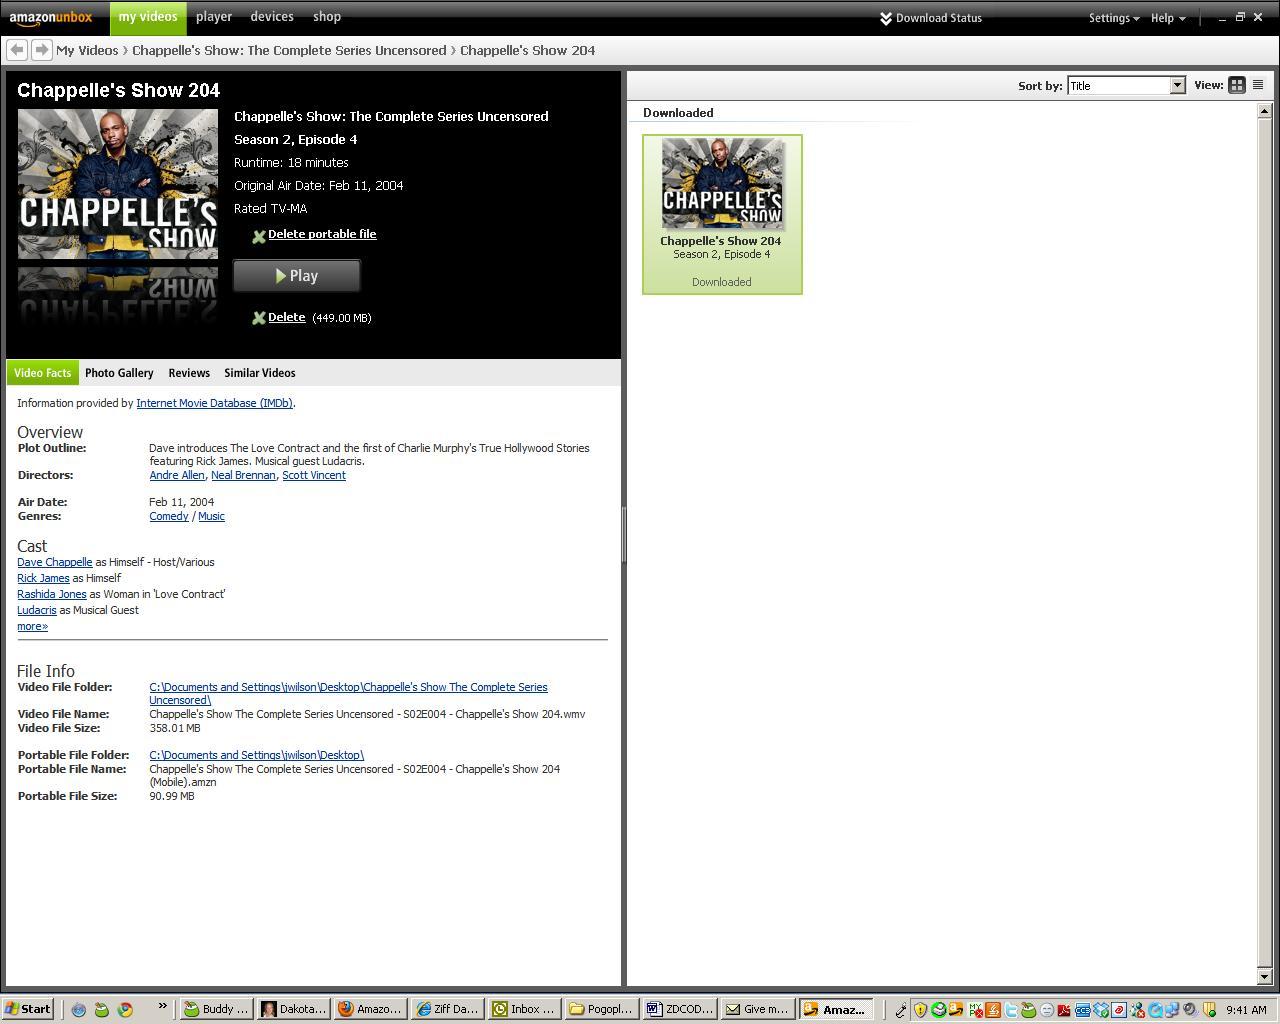
At first blush Amazon appears to offer an easy option with its downloadable Unbox Player, but the fine print renders Amazon’s own tool almost useless for practical purposes.
Sure, you can use the Unbox Player to download movies and television shows you’ve rented or purchased on Amazon, but you can’t use it to download the Amazon Prime Instant Video content that you can stream through your Amazon Prime subscription. The Unbox Player does let you stream that stuff, but streaming through Unbox isn’t any different than streaming through your browser.
Amazon’s Unbox player is great for downloading digital copies of movies and TV shows you’ve purchased on Amazon, but you can’t use it to save streaming Instant Video for later. If you want to do that, you’ll have to turn to some unorthodox third-party alternatives.
I rented a movie on Amazon to test whether Unbox could indeed download files for later. A half hour and several rounds of quitting out of the program and refreshing my recent purchases later, the film finally showed up in Unbox for offline viewing.
The user experience was unpleasant, and offered no added convenience compared with watching video in my browser or through iTunes. Amazon’s official solution to the offline-viewing problem is a bit of a wash. Fortunately, as I’ll discuss later, some unsanctioned third-party alternatives can give you considerably more control over your streamed media.
Jumping through hoops to save Hulu video
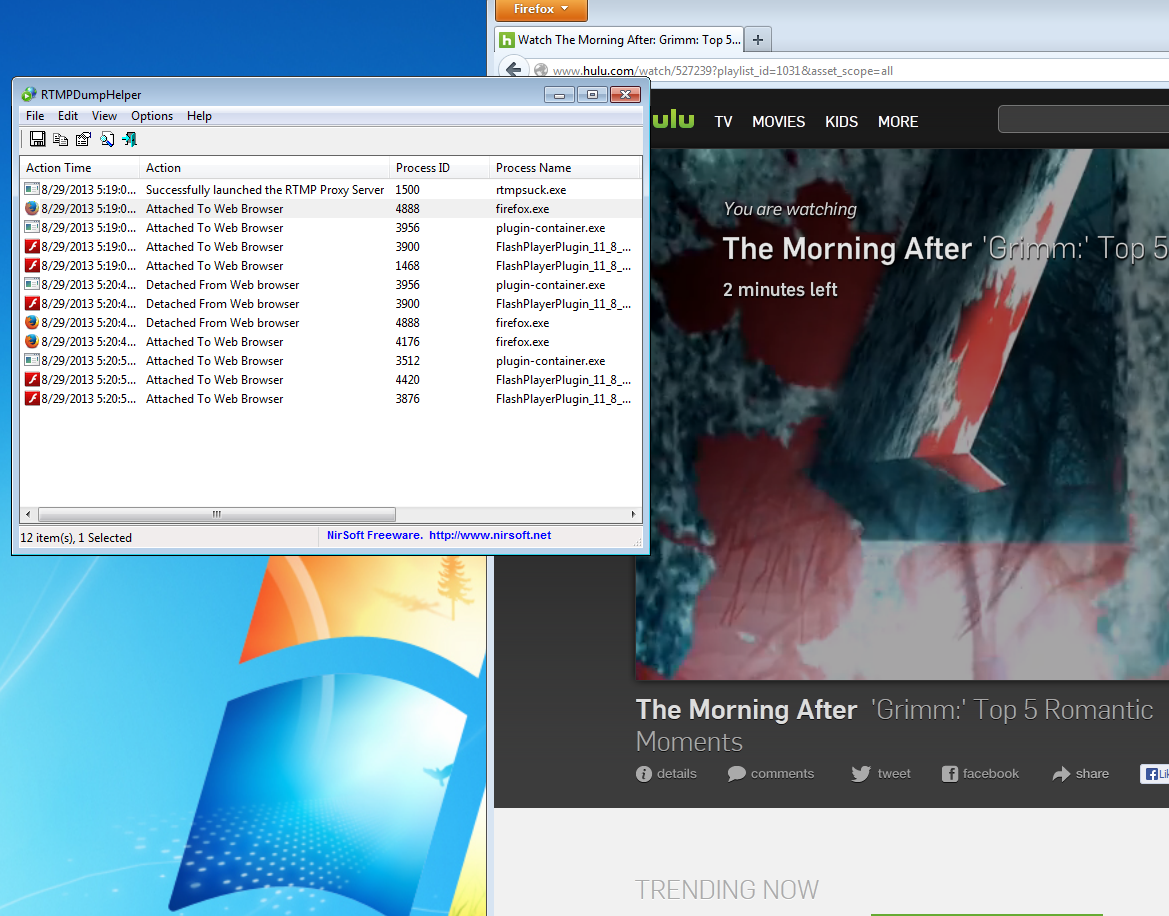
Hulu doesn’t provide an official download option. Viewers who want to record streaming movies and TV for later enjoyment should try RTMPDumpHelper, a free utility designed to download media that you’re streaming via RTMP (Real Time Messaging Protocol, which Hulu uses). Your experience may differ on Linux, but on Windows you can simply download RTMPDumpHelper and the RTMPDump Toolkit, unzip both into one folder, and then open the RTMPDumpHelper program.
RTMPDumpHelper will walk you through the process of establishing a proxy server that will intercept any RTMP streams (including those for Hulu and several smaller video-streaming sites) and save them as an MP4 file. Be warned, though: Setup can be somewhat finicky, and the documentation is a little technical.
RTMPDumpHelper will capture media to your hard drive from your browser as you stream it, allowing you to record a copy of your favorite movies and shows for offline viewing.
During my testing, RTMPDump never successfully attached itself to Chrome—my browser of choice—even after I tried multiple suggested solutions online. I eventually gave up and opened Firefox, which RTMPDump readily recognized.
However, even after RTMPDump was hooked into my browser, about a third of the time the program failed to notice that I was streaming a new video from Hulu. I had to reload the page—but since it was easy to see whether the stream was being recorded in the RTMPDumpHelper window, the extra step added only a few seconds of inconvenience.
Futzing with RTMPDumpHelper can be a little frustrating, but the results are worth your trouble. Of all the methods I used, RTMPDump produced usable video the fastest—usually just a few moments after my streams finished, taking minimal processing time compared with other options. It also recorded video in a format (MP4) that was easy to transfer to my phone or tablet, or to watch later on my PC. In fact, if RTMPDump were a ubiquitous utility, it would be the best way to download streaming media, period. The problem is, most streaming sites—including Netflix, the biggest name in streaming video—don’t use RTMP.
Taking back Netflix
If downloading videos from Amazon and Hulu seems difficult, well, I’m afraid Netflix has made the process almost impossible. Several years ago you could intercept a stream directly from Netflix, à la RTMPDump, but Netflix wised up and now exerts much tighter control over your streaming data.
In fact, the only reliable method I could find to get a copy of a Netflix stream was to record it from the screen. Plenty of programs, including free options such asCamStudio, will let you record both the audio and the video from your computer screen as it plays.
Recording the video yourself does come with a few caveats. First, it’s a demanding task that will tax your PC’s hardware. Often your recordings can contain a lot of skipped frames if you’re trying to capture video at a fairly high resolution, especially on older computers that have their hands full just streaming full-screen video in the first place.
Second, the files produced when you perform screen capturing are typically huge. For example, before I tweaked all the settings in CamStudio, my sample videos exceeded 200MB for just 30 seconds of footage. You’ll need to experiment to figure out the optimal balance of recording size and quality for you and your available storage.
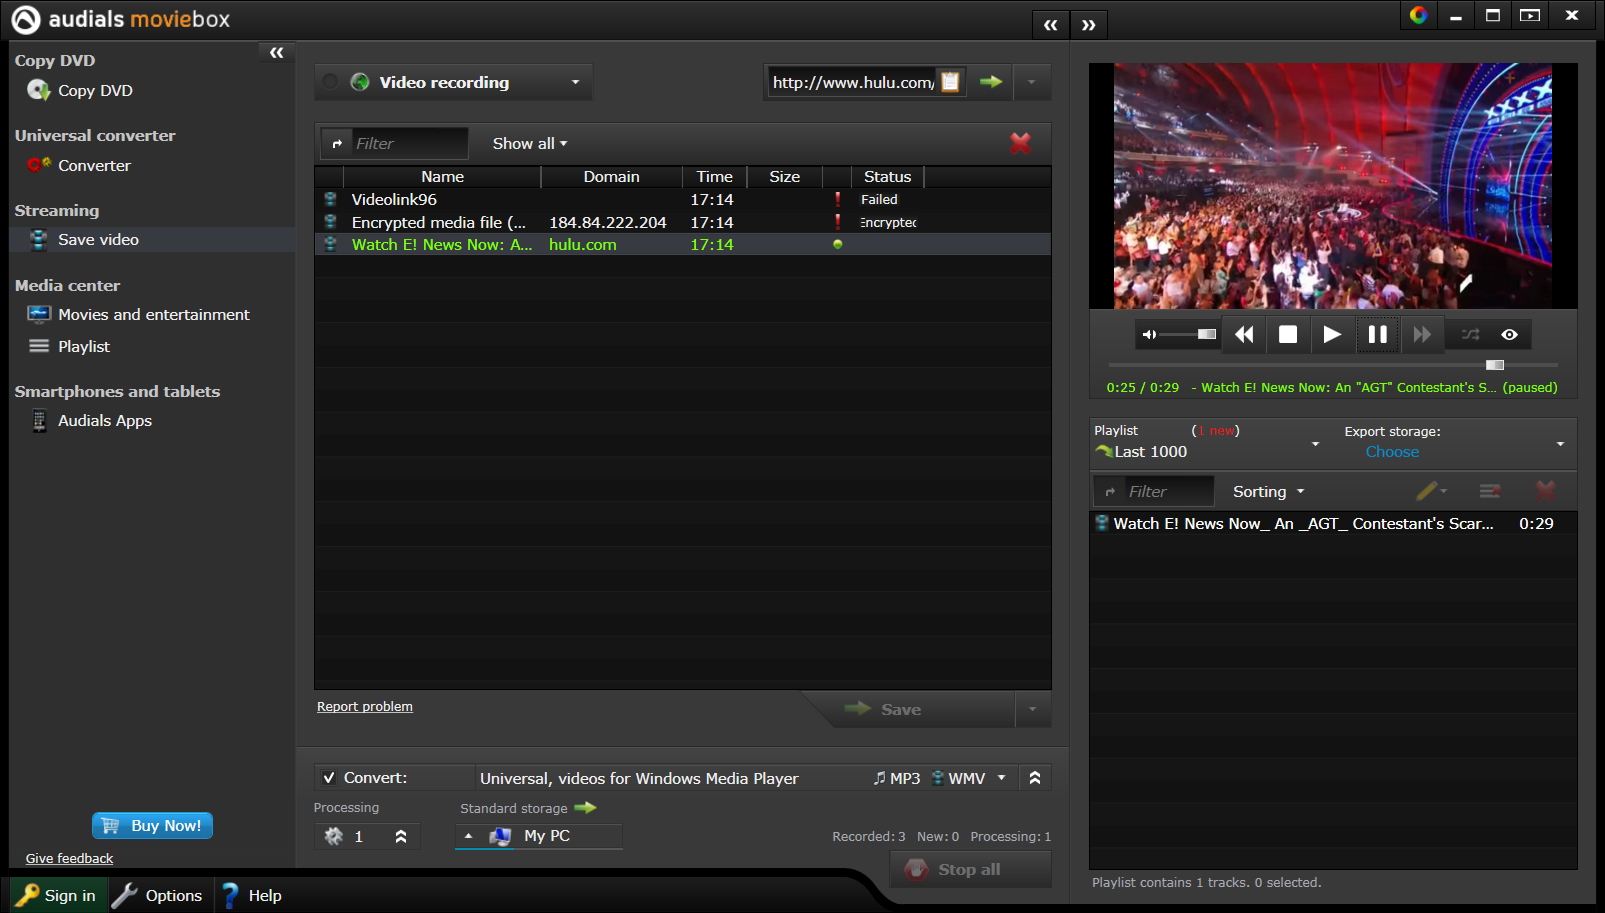
Inexpensive screen-recording programs such as Audials give you the power to record and store anything you can play on your PC screen.
That said, such problems become easier to deal with if you upgrade from free to paid software. Although screen-capturing with Audials, a $25 program, is still a system-intensive task that leaves you with gigantic files, paying for the software unlocks a lot of settings and presets. With most streams in my tests, the procedure was as easy as entering a URL and then letting the program open a new tab to begin recording. Getting the file size to reasonable levels (less than 1GB for an hour-long program) took very little tweaking.
Screen recording has other advantages as well. Since you’re merely recording the video that’s playing on your screen, you can use this trick with any streaming service. I eventually managed to record a stream using Audials on all three of the major streaming services, and you could do the same thing with Twitch, YouTube, or any other online video service.
Pay someone else to do it for you
You can save some time and hassle by automating your streaming media recording completely. PlayLater is a new service that lets you queue up your accessible streaming media and records it for you in the background. It delivers an MP4 file after the stream ends, without interrupting your other computing tasks.
Paying $20 a year, or $40 for a lifetime subscription, allows you to use the PlayLater service and search for any stream on any service to which you legally have access. For paid services such as Amazon Prime or Netflix, you’ll need to enter your login information; once you do, PlayLater presents an easy-to-use interface for finding streaming video and saving it to your computer as fast as you can stream it.
If all of that sounds too good to be true—or legal—don’t worry: Thanks to a 2010 ruling that protects the consumer’s right to watch “time-shifted” media (the same one that makes recording streams yourself legal), the service should be protected.
PlayLater has positioned itself as a DVR for online streams, which should be perfectly legal. Of course, the law surrounding copyright and online media is constantly shifting, but for now PlayLater is offering a service that simply automates the legal recording and rewatching of online video that you could perform yourself.
Of course, no matter which method you choose, once your recordings are in a file format that’s right for you, the world is your oyster. Your newly captured media can reside on your phone or tablet for safekeeping. Depending on which formats your mobile devices prefer, you may need to convert the file, but that’s simple enough—and you’ll never again have to worry because, say, Netflix removed Farscape from its streaming library while you were right in the middle of the second season (just as a crazy example). You’ll even be able to use your downloaded media with services such as Plex, which makes watching video from Netflix or Hulu on your home-theater system way more convenient.
Microsoft is poised to release Windows 8.1, a deep and crucial revamping of the Windows 8 ideal. The code is final (though Microsoft reserves the right to tweak it further), and the time for speculation is over. Does Windows 8.1 atone for Windows 8’s sins?
Yes and no, and that answer is utterly appropriate. More than being just another update, Windows 8.1 is a lesson in true compromise—for Microsoft, and for us.
Compromises
For Microsoft, the “no compromises” mantra guided Windows 8’s development. PC or tablet, modern apps or traditional desktop software, glittering aesthetics or buckle-down productivity, Windows 8 was the operating system that was supposed to deliver it all.
But a funny thing happened on the way to ubiquity: Microsoft’s “everything and the kitchen sink” approach to its new-look operating system wound up, well, pretty darned compromised.
Rather than delivering a seamless experience, the modern UI and the desktop interface gave Windows 8 a warring, “Jekyll and Hyde” feel. To make matters worse, the operating system had a nasty habit of ripping you away from one interface and unceremoniously dumping you into the other. The modern UI—while gorgeous—felt half-baked at best, chock-full of byzantine interfaces and missing functionality. And in a bid to push everyone into the modern mobile age, Microsoft eradicated the beloved Start button and made booting directly to the desktop impossible.
PC devotees felt jilted, and complained about their perceived second-tier status.Computer sales plummeted. Now, less than a year later, longtime Microsoft CEO Steve Ballmer has announced his resignation. No compromises.
My colleague Mark Hachman hit the nail on the head in his wrap-up for the Windows 8.1 Preview: “Windows users skewered Windows 8 for various sins, and Microsoft took the high road by addressing a number of the problems in 8.1.”
The new shutdown options in the power menu.
That effort to meet in the middle is embodied by Windows 8.1’s new boot-to-desktop option. Although the feature is as simple as simple could be, and buried deep in an obscure submenu, its existence is a boon to desktop diehards who resorted to arcane workarounds to avoid Windows 8’s mandatory Start screen. The boot-to-desktop option makes using Windows 8 on nontouch devices far less frustrating; ditto for the new shutdown options found in the ‘Power User’ menu, which you can open by pressing Windows-X or by right-clicking the lower-left corner of the desktop.
Ironically, while the tweaks stray from Windows 8’s modern-first focus, they help Windows 8.1 inch closer to the “no compromise” ethos by letting a PC be a PC.
Not all of Windows 8.1’s desktop tweaks are quite as welcome. For one thing, the File Explorer doesn’t show libraries by default anymore (though you can easily restore them by selecting View > Navigation Pane > Show Libraries). More contentious is the much-ballyhooed return of the Start button—but not the Start menu and its list of programs and shortcuts.
Clicking the Start button deposits you among the live tiles of the modern Start screen. The jump is confusing at first, but it makes sense if you think of the Start screen as a modern Start menu. What’s more, Windows 8.1 allows you to tweak the Start button to open the Start screen’s All Apps list instead, which delivers a much more Start menu-esque experience while still enveloping you in the modern UI. The new approach is a reasonable compromise, but it also demands compromise from you.
Flattening the learning curve
The new Help + Tips app ensures that assistance for novices is just a click away.
The Start button’s new functionality isn’t there just to irritate you, though: It provides a visual clue as to how to exit the desktop, and it reinforces the notion that the Start screen replaces the old Start menu. “Aha!” you’ll say when you click it and open the Start screen the first time. “Now I get it!”
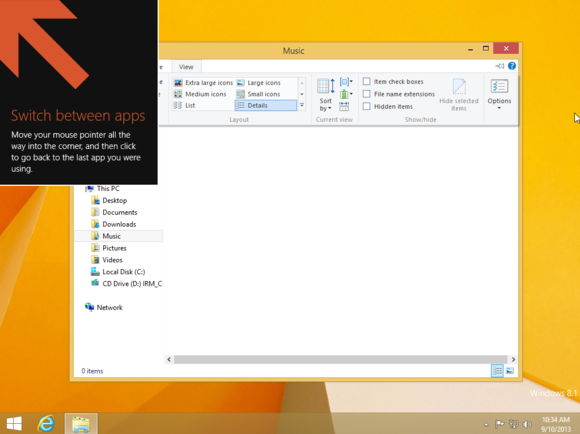
The hints don’t stop there. While Windows 8 was lambasted for its hands-off, sink-or-swim approach to guiding users through the revamped UI—it was so bad that many manufacturers preinstalled their own tutorial apps on their PCs—Windows 8.1 is packed with helpful usability clues and improvements.
Whereas Windows 8 cast new users into the mix with nary a peep, Windows 8.1 veritably beats newcomers over the head with helpful tips such as the one shown here.
Big, bold boxes pop up after installation, clearly identifying the various hot corners and explaining how to use them. A new, baked-in Help + Tips app provides straightforward tutorials on all aspects of controlling your machine, with lush visuals and short animations. A downward-pointing arrow appears when you move your mouse on the Start screen, marking the way toward the All Apps screen. Even the Windows Store received an overhaul for easier browsing.
It’s wonderful. Windows 8.1 will still be a shock to new users, but it promises a far easier learning curve than Windows 8 required.
Usability calibrations
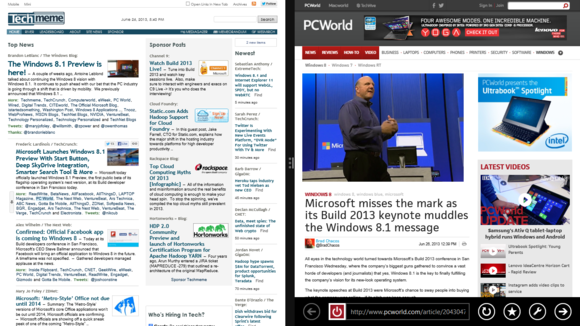
Two Internet Explorer windows, each snapped to fill half the screen.
Once you’ve dispensed with the basics, Windows 8.1’s ability to have three or more apps “snapped” open at once, complete with the option to adjust the size of each app dynamically, amps up the usability of the modern UI. (Windows 8 proper allows only two apps on screen at once, in a 75/25 split.) Also new, some apps—such as Internet Explorer 11—can open in multiple windows. The feature is no competition for the variability of traditional desktop windows, but hey: compromise.
The free update also beefs up the modern-style PC Settings menu, adding numerous options that previously required a jaunt into the desktop Control Panel. Likewise, the SkyDrive app now lets you browse through your local files, serving as a modern-style pseudo-File Explorer. Again, they’re small tweaks, but the fixes make it easier to stay in your interface of choice.
Some of the new options available in PC Settings.
If you do decide to break down the interface walls, Microsoft made the transition easier with some UI-spanning additions that really help Windows 8.1 feel like a cohesive whole. The new and superb Bing Smart Search—one of the top five reasons to upgrade to Windows 8.1—pulls in information from modern apps, desktop files, and the Web alike, creating a comprehensive list of results. (Too bad about the ads, though.)
Meanwhile, another new option lets you share your desktop wallpaper with the modern Start screen, imbuing the entire OS with a unified feel. Rough patches remain, but switching from the modern UI to the desktop is mostly less jarring and more voluntary than before.
Bing Smart Search pulls in results from every corner of your PC, your apps, and the Net.
Microsoft has even enhanced the lock screen so that you can answer Skype calls and snap camera shots without unlocking your device.
That isn’t to say Windows 8.1 fixes every flaw, though. I’d still like to see some sort of visual indicator for the hidden charm bar, and a more obvious way to shut down or restart the machine. Many options remain buried beneath superfluous clicks and menus, as well.
Iterating into the future
The new Bing Health & Fitness app in Windows 8.
By and large, the Windows 8.1 RTM version (that is, the version shared with manufacturers) largely mirrors the Windows 8.1 Preview—it’s packed with an abundance of new features, new hidden secrets, and even a plethora of new apps. Since our previous articles talked about the majority of the fresh features in far greater depth than I could here, I’ll just mention that a slightly tweaked version of the Skype app comes baked in to Windows 8.1, replacing Windows 8’s Messaging app.
Virtually all of Windows 8.1’s baked-in modern apps have seen an overhaul of some sort; the retooled Mail app shines especially brightly. (Yay for opening mail in a new window!) Rather than diving into the minutiae, let’s take a minute to talk about what these changes mean for Windows.
The updated, Outlook.com-style Mail app in Windows 8.1.
More than any other operating system before it, Windows 8.1 wraps itself snugly around a Web-centric core. The vast majority of Windows 8.1’s native apps are inextricably linked to Microsoft services and require a connected Microsoft Account to work. SkyDrive hums along silently in the background, automatically saving your data and photos, and syncing more settings across all your Windows 8.1 devices than ever before. (Now included: apps!) Meanwhile, new default settings automatically update all those apps in the background, keeping you on the cusp of what’s new.
Windows 8.1 embodies the “One Microsoft, all the time” creed in some truly staggering ways. When everything is working smoothly, the operating system creates a deeply personal experience that travels with you across devices. There’s no denying that Microsoft’s new focus on rapid-fire updates—rather than the multiyear development cycles of the past—has helped to whip Windows 8’s originally dreadful native apps into far better shape in comparatively short order.
In fact, Microsoft services are so intertwined with Windows 8.1 and are being updated so briskly that the company has warned developers that the RTM release is only kinda-sorta final code; Windows 8.1 and its apps could see further tweaks by the time the update is released to the public.
SkyDrive’s sync options are far more full-featured in Windows 8.1.
All that said, some people may not appreciate being bound so tightly to the cloud, nor to Microsoft. Conversely, if you’ve been burned by a rogue Windows update in the past, you might not like the idea of a dozen-plus apps constantly updating without warning. Be aware of your settings!
Bottom line
The Windows 8.1 Start screen.
In all the ways that matter, Windows 8.1 is the operating system Windows 8 should have been, and a glimpse into what the Microsoft of the future could be.
Is it perfect? Nope. It doesn’t even contain all the features we’d like to see. At its core, Windows 8.1 is still a tablet interface mashed together with a desktop UI, a funky hybrid of old and new. The modern UI is still around; compromise runs both ways.
But Windows 8.1 makes Microsoft’s formula more palatable—or at least, less bitter—for those who choose to make the leap. Windows 8.1 eases the transition for desktop diehards, granting PC enthusiasts the ability to shun most of the tablet-oriented bits. New tutorials and UI hints will greatly help displaced adoptees. And if you do decide to wade into the live tiles, you’ll find that the modern UI environment in Windows 8.1 Improves vastly over that of Windows 8. As an update, an apology, and a lesson in compromise, it’s stunningly successful.
Microsoft still offers little here to win over desktop diehards who snarl at the merest mention of the word modern, but if you’ve already made the switch, you have absolutely no reason to avoid the free update when it hits the Windows Store on October 17.